Content code
m1225
Slug (identifier)
constructing-a-square-and-a-rectangle
Parent content
Grades
Secondary I
Secondary II
Topic
Mathematics
Tags
segment
règle
segment initial
compas
initial
rectangle
construire un carré
dessiner un carré
construction d'un carré
construire un rectangle
construction d'un rectangle
dessiner un rectangle
construire un losange
dessiner un losange
construction d'un losange
construire un parallélogramme
dessiner un parallèlogramme
construction d'un parallélogramme
carrés
losanges
parallélogrammes
parallélogramme
Content
Contenu
Corps

Constructing a quadrilateral requires the use of geometry tools such as a ruler, a set square, a protractor, and a compass. The method used to construct a quadrilateral will differ depending on the type of quadrilateral that must be drawn.

Links
Title (level 2)
Drawing a Square
Title slug (identifier)
square
Contenu
Content
Corps

A square is a quadrilateral with congruent side lengths where all interior angles measure |90^\circ.|

Title (level 3)
Set Square and Ruler Method
Title slug (identifier)
set-square-and-ruler-1
Corps

Follow these steps to draw a square using a set square and a ruler.

Surtitle
Règle
Content
Corps
  1. Using a ruler, draw a line segment corresponding to the length of one side of the square.

  2. Place the set square at one end of the line segment and draw a perpendicular line that is longer than the side of the square.

  3. Using the ruler, mark a point on this line that corresponds to the length of the side of the square.

  4. Repeat step 2, but at the other endpoint of the line segment drawn in step 1.

  5. Repeat step 3 on the line segment drawn in step 4.

  6. Using the ruler, connect the two marks made in steps 3 and 5 to form the square.

Corps

Here is an example of the procedure with illustrations.

Content
Corps

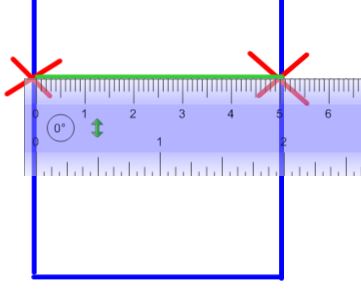
Follow these steps to draw a square whose sides measure |5\ \text{cm}.|

  1. Using a ruler, draw a line segment corresponding to the length of one side of the square |(5\ \text{cm}).|


  1. Place the set square at one end of the line segment and draw a perpendicular line that exceeds |5\ \text{cm}.|


  1. Using the ruler, mark a point on this line that corresponds to |5\ \text{cm}.|


  1. Place the set square at the other endpoint of the line segment drawn in step 2 and draw a perpendicular line longer than |5\ \text{cm}.|


  1. With the ruler, mark a point on this line segment that corresponds to |5\ \text{cm}.|

  1. Next, use the ruler to connect the two points made in steps 3 and 5.


m1225i37.jpg
Title (level 3)
Compass, Ruler and Set Square Method
Title slug (identifier)
compass-set-square-and-ruler-1
Corps

Follow these steps to draw a square using the compass, set square, and ruler.

Surtitle
Règle
Content
Corps
  1. Use a ruler to draw a line segment that is equal in length to one side of the square.

  2. Open the compass to the same size as the line segment. Keep the same compass opening throughout the procedure.

  3. Place the compass anchor (sharp point) at one end of the line segment and draw an arc.

  4. Place the compass anchor on the other end of the line segment and draw another arc.

  5. Using the set square, connect one end of the line segment to the arc above it. Repeat at the other end of the line segment.

  6. Using the ruler, trace a line to join these two meeting points and complete the square.

Corps

Here is an example of the procedure with illustrations.

Content
Corps

​Follow these steps to draw a square with sides measuring |5\ \text{cm}.|

  1. Using a ruler, draw a line segment that is equal in length to one side of the square |(5\ \text{cm}).|


  1. Open the compass to the same size as the line segment |(5\ \text{cm}).| Keep the same compass opening throughout the procedure.


  1. Place the compass anchor (sharp point) at one end of the line segment and draw an arc.


  1. Place the compass anchor at the other end of the line segment and draw another arc.

  1. Using the set square, connect one end of the line segment to the arc above it. Repeat at the other end of the line segment.


  1. Using a ruler, trace a line to join these two meeting points and complete the square.

Title (level 2)
Drawing a Rectangle
Title slug (identifier)
rectangle
Contenu
Content
Corps

A rectangle is a quadrilateral whose opposite sides are parallel and have the same measurement. Also, all of its interior angles measure |90^\circ.|

Title (level 3)
Set Square and Ruler Method
Title slug (identifier)
set-square-and-ruler-2
Corps

Follow these steps to draw a rectangle using a set square and a ruler.

Surtitle
Règle
Content
Corps
  1. Use a ruler to draw a line segment corresponding to the same measurement as the longest side of the rectangle (length).

  2. At one end of the line segment, use the set square to draw a perpendicular line that is larger than the width of the rectangle.

  3. Using the ruler, mark a point on the perpendicular line drawn in step 2 that corresponds to the width of the rectangle.

  4. Repeat step 2 at the other end of the initial line segment.

  5. Using the ruler, mark a point on the perpendicular line drawn in step 4 that corresponds to the width of the rectangle.

  6. Using the ruler, draw a line connecting the two points on the perpendicular lines to complete the rectangle.

Corps

Here is an example of the procedure with illustrations.

Content
Corps

​Use the following steps to draw a rectangle with a length of |7\ \text{cm}| and a width of |4\ \text{cm}.|

  1. With a ruler, draw a line segment corresponding to the same measurement as the longest side of the rectangle |(7\ \text{cm}).|


  1. Place the set square at one end of the line segment and draw a perpendicular line that exceeds |4\ \text{cm}.|

  1. Using the ruler, mark a point on the perpendicular line that corresponds to the width of |4\ \text{cm}.|


  1. Place the set square at the other end of the initial line segment and draw a perpendicular line that exceeds |4\ \text{cm}.|

  1. Using the ruler, mark the location on the perpendicular line that corresponds to the width of |4\ \text{cm}.|

  1. Using the ruler, connect the two points on the perpendicular lines made in steps 3 and 5.

Title (level 3)
Compass, Set Square, and Ruler Method
Title slug (identifier)
compass-set-square-and-ruler-2
Corps

Follow these steps to draw a rectangle using the compass, set square, and ruler.

Surtitle
Règle
Content
Corps
  1. With a ruler, draw a line segment with the same measurement as the length of the rectangle.

  2. Open the compass so that it corresponds to the width of the rectangle. Maintain this compass opening throughout the process.

  3. Place the compass anchor (sharp point) at one end of the initial line segment and draw an arc.

  4. Place the compass anchor on the other end of the initial segment and draw an arc of a circle.

  5. Using the set square, draw two perpendicular lines joining both ends of the initial line segment to each of the arcs above them.

  6. Using the ruler, draw a line to connect the two meeting points and complete the rectangle.

Corps

Here is an example of the procedure with illustrations.

Content
Corps

Follow these steps to draw a rectangle with a length of |7\ \text{cm}| and a width of |4\ \text{cm}.|

  1. With a ruler, draw a line segment with the same measurement as the longest side of the rectangle |(7\ \text{cm}).|


  1. Open the compass so that it corresponds to the width of the rectangle |(4\ \text{cm})|. Maintain this compass opening throughout the process.


  1. Place the compass anchor at one end of the initial line segment and draw an arc.

  1. Place the compass anchor at the other end of the initial line segment and draw an arc.

  1. Using the set square, draw two perpendicular lines joining both ends of the initial line segment with each of the arcs above them.


  1. Using the ruler, draw a line to connect the two meeting points.

Remove audio playback
No